Motion动画

1.在说动画实现之前先针对几个设置相关的属性解释一下
<?xml version="1.0" encoding="utf-8"?>
<MotionScene xmlns:android="http://schemas.android.com/apk/res/android"
    xmlns:app="http://schemas.android.com/apk/res-auto">

    <Transition
        android:id="@+id/backward"
        app:constraintSetEnd="@+id/previous"
        app:constraintSetStart="@id/start"
        app:duration="1000">

        <OnSwipe
            app:dragDirection="dragLeft"
            app:touchAnchorSide="left" />

    </Transition>

    <Transition
        android:id="@+id/forward"
        app:constraintSetEnd="@id/next"
        app:constraintSetStart="@id/start">

        <OnSwipe
            app:dragDirection="dragRight"
            app:touchAnchorSide="right" />

    </Transition>


    <ConstraintSet android:id="@+id/previous">

        <Constraint
            android:id="@id/iv0"
            android:layout_width="60dp"
            android:layout_height="200dp"
            app:layout_constraintBottom_toBottomOf="parent"
            app:layout_constraintStart_toStartOf="parent"
            app:layout_constraintTop_toTopOf="parent" />

        <Constraint
            android:id="@id/iv1"
            android:layout_width="0dp"
            android:layout_height="200dp"
            app:layout_constraintBottom_toBottomOf="parent"
            app:layout_constraintEnd_toStartOf="@id/iv2"
            app:layout_constraintStart_toEndOf="@id/iv0"
            app:layout_constraintTop_toTopOf="parent" />

        <Constraint
            android:id="@id/iv2"
            android:layout_width="60dp"
            android:layout_height="200dp"
            app:layout_constraintBottom_toBottomOf="parent"
            app:layout_constraintEnd_toEndOf="parent"
            app:layout_constraintTop_toTopOf="parent" />

        <Constraint
            android:id="@id/iv3"
            android:layout_width="60dp"
            android:layout_height="200dp"
            app:layout_constraintBottom_toBottomOf="parent"
            app:layout_constraintStart_toEndOf="parent"
            app:layout_constraintTop_toTopOf="parent" />

    </ConstraintSet>


    <ConstraintSet android:id="@+id/start">

        <Constraint
            android:id="@id/iv0"
            android:layout_width="60dp"
            android:layout_height="200dp"
            app:layout_constraintBottom_toBottomOf="parent"
            app:layout_constraintEnd_toStartOf="parent"
            app:layout_constraintTop_toTopOf="parent" />

        <Constraint
            android:id="@id/iv1"
            android:layout_width="60dp"
            android:layout_height="200dp"
            app:layout_constraintBottom_toBottomOf="parent"
            app:layout_constraintStart_toStartOf="parent"
            app:layout_constraintTop_toTopOf="parent" />

        <Constraint
            android:id="@id/iv2"
            android:layout_width="0dp"
            android:layout_height="200dp"
            app:layout_constraintBottom_toBottomOf="parent"
            app:layout_constraintEnd_toStartOf="@id/iv3"
            app:layout_constraintStart_toEndOf="@id/iv1"
            app:layout_constraintTop_toTopOf="parent" />

        <Constraint
            android:id="@id/iv3"
            android:layout_width="60dp"
            android:layout_height="200dp"
            app:layout_constraintBottom_toBottomOf="parent"
            app:layout_constraintEnd_toEndOf="parent"
            app:layout_constraintTop_toTopOf="parent" />

        <Constraint
            android:id="@id/iv4"
            android:layout_width="60dp"
            android:layout_height="200dp"
            app:layout_constraintBottom_toBottomOf="parent"
            app:layout_constraintStart_toEndOf="parent"
            app:layout_constraintTop_toTopOf="parent" />

    </ConstraintSet>

    <ConstraintSet android:id="@+id/next">

        <Constraint
            android:id="@id/iv1"
            android:layout_width="60dp"
            android:layout_height="200dp"
            app:layout_constraintBottom_toBottomOf="parent"
            app:layout_constraintEnd_toStartOf="parent"
            app:layout_constraintTop_toTopOf="parent" />

        <Constraint
            android:id="@id/iv2"
            android:layout_width="60dp"
            android:layout_height="200dp"
            app:layout_constraintBottom_toBottomOf="parent"
            app:layout_constraintStart_toStartOf="parent"
            app:layout_constraintTop_toTopOf="parent" />

        <Constraint
            android:id="@id/iv3"
            android:layout_width="0dp"
            android:layout_height="200dp"
            app:layout_constraintBottom_toBottomOf="parent"
            app:layout_constraintEnd_toStartOf="@id/iv4"
            app:layout_constraintStart_toEndOf="@id/iv2"
            app:layout_constraintTop_toTopOf="parent" />

        <Constraint
            android:id="@id/iv4"
            android:layout_width="60dp"
            android:layout_height="200dp"
            app:layout_constraintBottom_toBottomOf="parent"
            app:layout_constraintEnd_toEndOf="parent"
            app:layout_constraintTop_toTopOf="parent" />
    </ConstraintSet>
</MotionScene>
针对上面的xml解释一些概念,MotionScene用于描述MotionLayout动画流程以及相关设置的所有属性
Transition定义了动画的开始和结束的状态,以及它持续的时间,它的属性包括:
- constraintSetStart动画的开始状态
- constraintSetEnd动画的结束状态
- duration动画的持续时间
- motionInterpolator差值器,数值变化的差值器,例如线性的变化,缓入缓存,缓入等等效果。
在一个MotionScene中可以有多个Transition的存在,用于实现在不同条件下的状态变化,它的组成包括有,OnSwipe,OnClick以及KeyFrameSet,下面我们来分别介绍它。
OnSwipe定义了在滑动时相关属性,它监听的是MotionLayout,而不是指定的id的视图,OnSwip相关的属性: - touchAnchorId是所跟踪的视图,它通过移动来响应轻触操作,MotionLayout会将该视图保持与快速滑动的手机相同的距离
- touchAnchorSide:用于确定应该跟踪视图的哪一侧。对于要调整大小,遵循复杂路径或一侧的移动数据比另一侧快的视图很重要。
- dragDirection用于确定可对该动画效果产生影响的方向(上下左右)
OnClick定义了在点击发生时的响应条件 - clickAction,事件响应类型,包括有toggle(切换,也就是在开始和结束状态之间来回的切换,类如一个view冲左移动到右边,那边再点击一次,那么它会执行从右边到左边移动的效果,反复执行),transitionToStart和jumpToStart最终效果都是执行view到start状态上,区别就是有没有过度的过程,transitionToEnd和jumpToEnd类似。
- targetId,响应这个点击事件的View的id
KeyFrameSet是transition的子集,它包含有KeyPosition
KeyPosition是当需要进行复杂路径的Motion动画时使用进行某一进度时的状态,而KeyFrameSet就是这些点的集合,这些点就可以构成整个动画的路径状态,KeyPosition的属性: - framePosition:是一个介于0到100的数字,它定义了动画中应用该KeyPosition的时间,其中1代表动画播放到1%的位置,99代表动画播放到99%的位置,
- motionTarget:是被该KeyPosition修改路径的视图
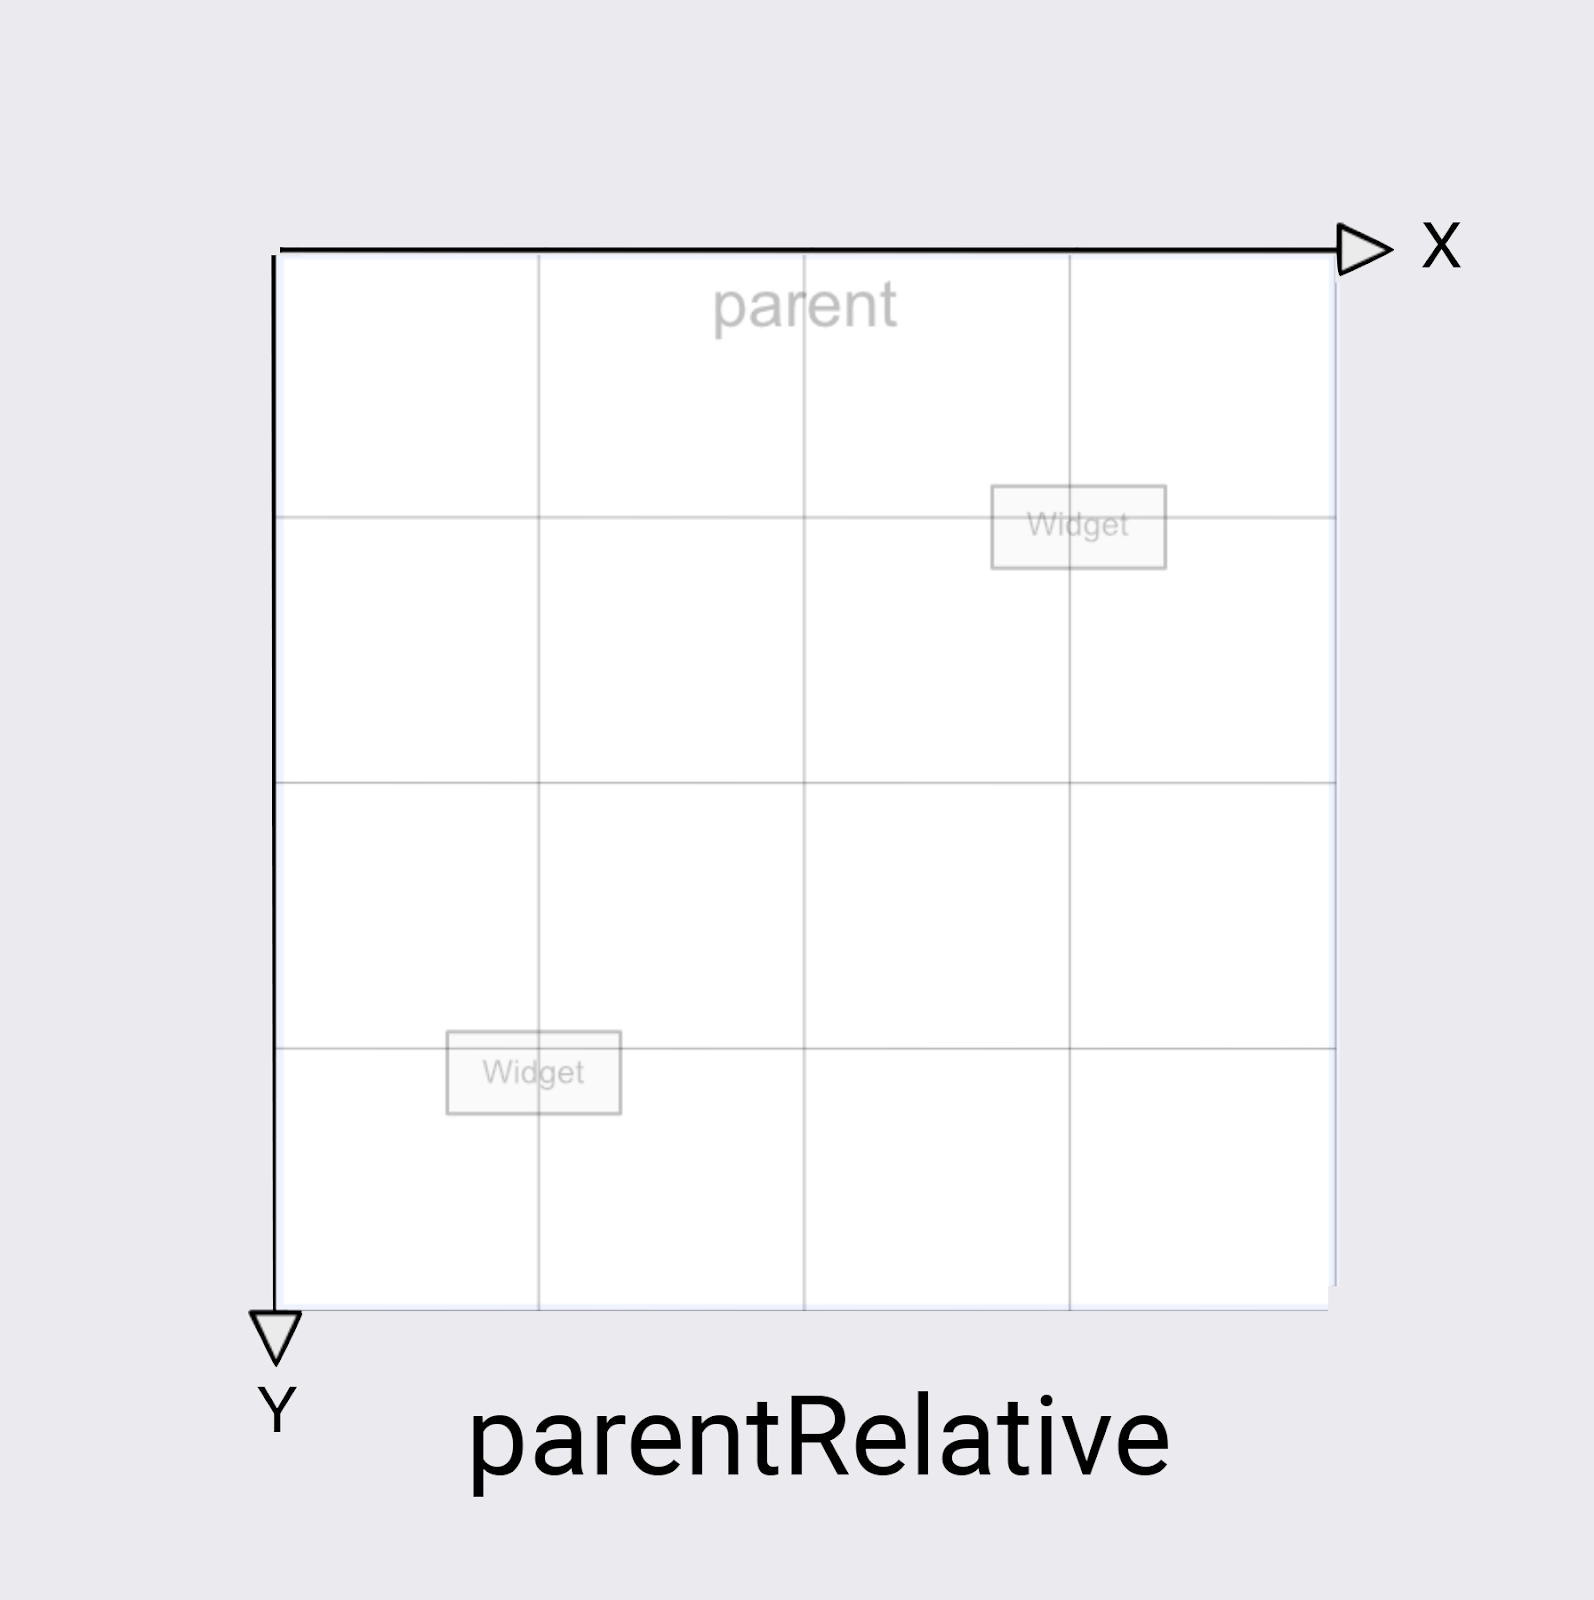
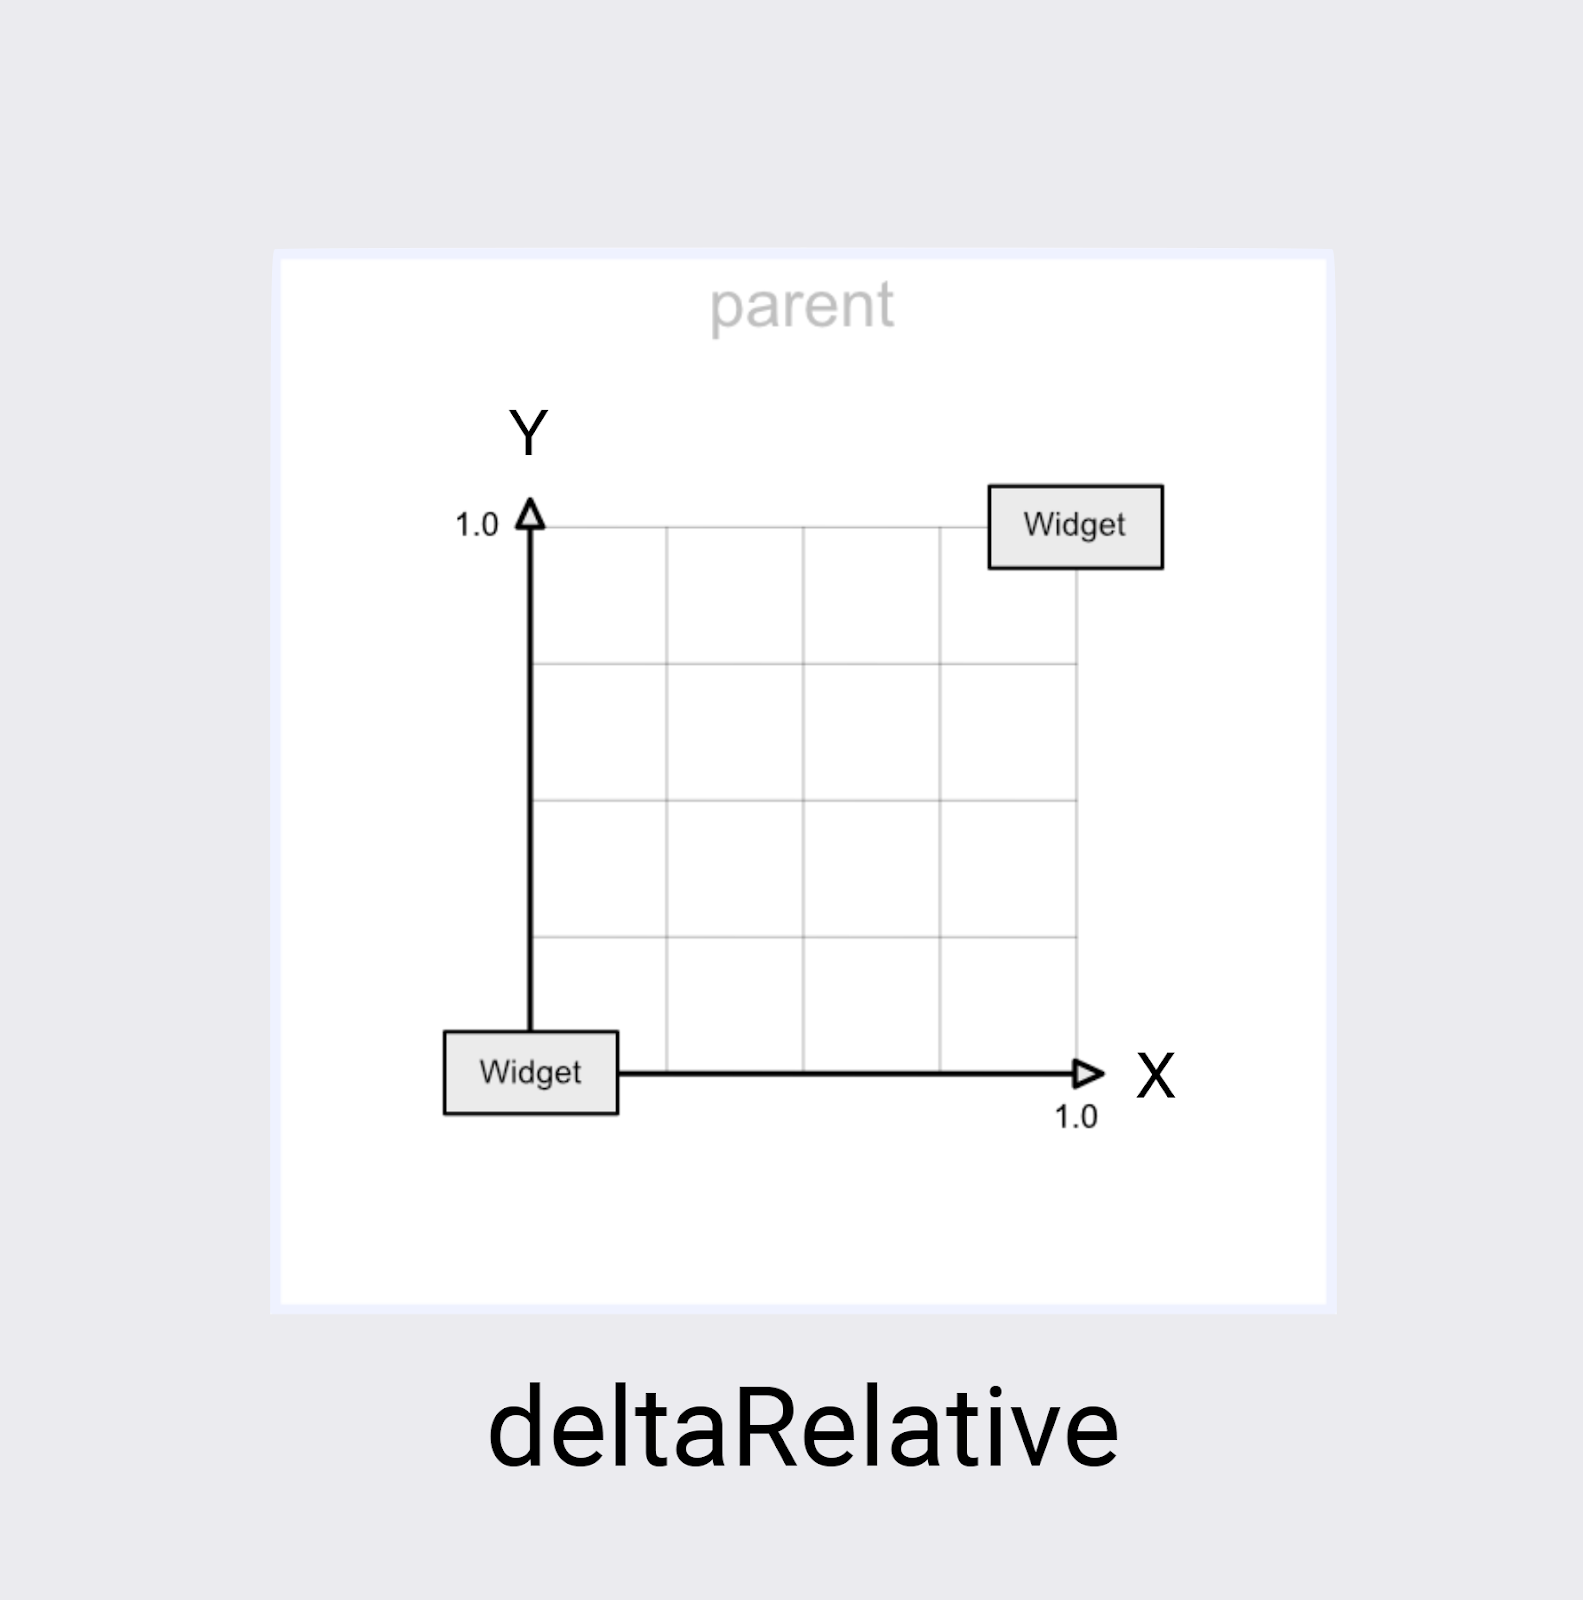
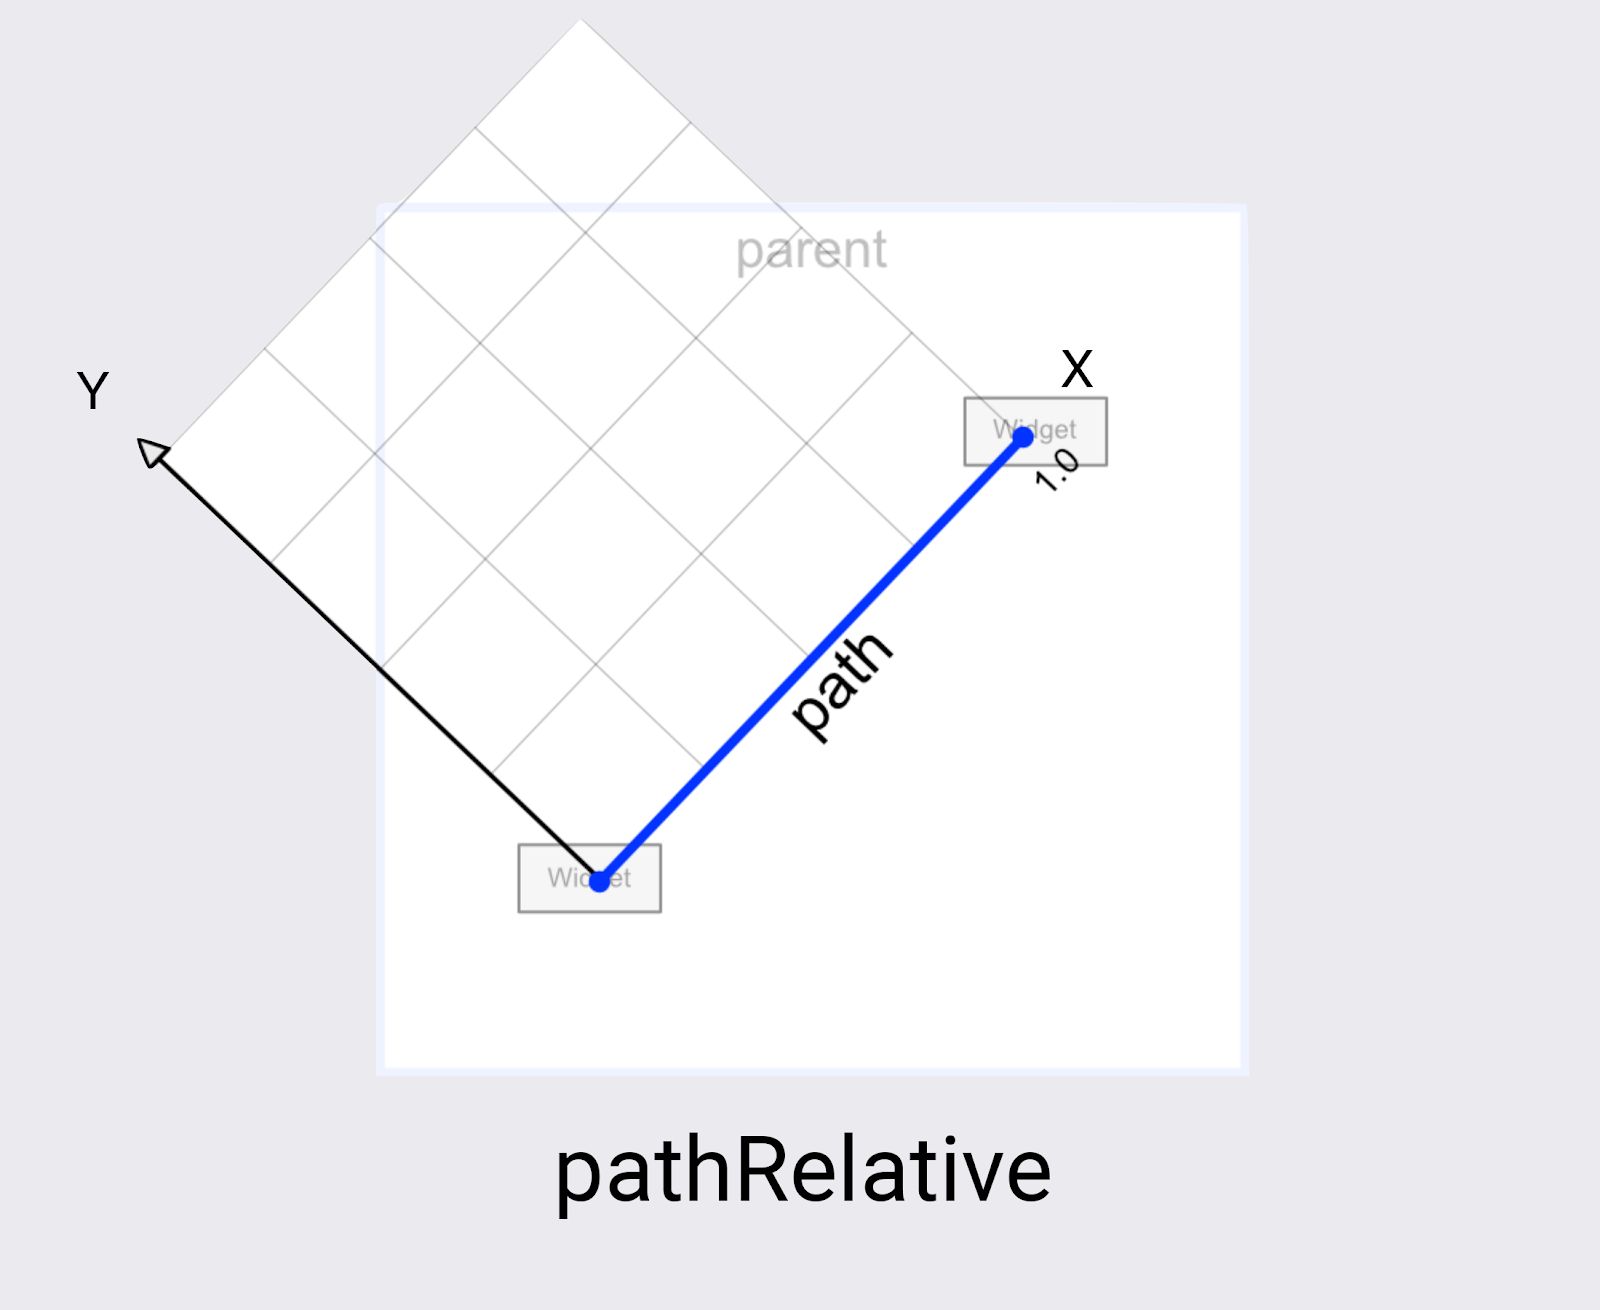
- keyPositionType:是该KeyPosition修改路径的方式。它可以是parentRelative,pathRelative或deltaRelative
- percentX|percentY是指在framePosition按多大百分比来修改路径(值介于0.0到1.0之间)允许使用负数和大于1的值
- curveFit默认情况下,MotionLayout 会将因修改路径而产生的所有角设为圆角,如果不需要这个弧度那么就是修改这个值,linear线性的变化,spline弧度变化。
其中keyPositionType三个值的区别就是它的坐标系的构成,下面是三个坐标系的表现形式:
官方关于keyPositionType的详细介绍
案例分析
案例1侧滑菜单
以往我们实现侧滑菜单时我们时通过DrawerLayout,实现DrawerListener,在回掉方法中动态修改view的状态和属性,现在我们通过结合DrawerLayout和MotionLayout来实现一个侧滑菜单:
import android.content.Context
import android.util.AttributeSet
import android.view.View
import androidx.constraintlayout.motion.widget.MotionLayout
import androidx.drawerlayout.widget.DrawerLayout

class DrawerContent @JvmOverloads constructor(
    context: Context,
    attrs: AttributeSet? = null,
    defStyleAttr: Int = 0
) : MotionLayout(context, attrs, defStyleAttr), DrawerLayout.DrawerListener {

    override fun onDrawerSlide(drawerView: View, slideOffset: Float) {
        //设置MotionLayout的变化进度
        progress = slideOffset
    }

    override fun onDrawerOpened(drawerView: View) {
    }

    override fun onDrawerClosed(drawerView: View) {
    }

    override fun onDrawerStateChanged(newState: Int) {
    }

    override fun onAttachedToWindow() {
        super.onAttachedToWindow()
        //注册相应的监听
        (parent as? DrawerLayout)?.addDrawerListener(this)
    }
}
定义Scene
<?xml version="1.0" encoding="utf-8"?>
<MotionScene xmlns:android="http://schemas.android.com/apk/res/android"
    xmlns:motion="http://schemas.android.com/apk/res-auto">

    <Transition
        motion:constraintSetEnd="@+id/end"
        motion:constraintSetStart="@id/start"
        motion:duration="250"
        motion:motionInterpolator="linear">

    </Transition>

    <ConstraintSet android:id="@+id/start">
        <Constraint
            android:id="@+id/rv"
            android:layout_width="match_parent"
            android:layout_height="match_parent"
            motion:layout_constraintStart_toStartOf="parent" />


    </ConstraintSet>

    <ConstraintSet android:id="@+id/end">
        <Constraint
            android:id="@+id/rv"
            android:layout_width="match_parent"
            android:layout_height="match_parent"
            android:layout_marginStart="180dp"
            android:scaleX="0.8"
            android:scaleY="0.8"
            motion:layout_constraintStart_toStartOf="parent" />
    </ConstraintSet>
</MotionScene>
这里可以看到我们的Transition是没有设置触发条件的,它就是通过progress来确定当前的动画的进度,变化效果就是在距离Parent的start的0-180dp的范围内变化,并且伴随有x轴和y的缩放,缩放范围1-0.8,在xml中的使用:
<?xml version="1.0" encoding="utf-8"?>
<androidx.drawerlayout.widget.DrawerLayout xmlns:android="http://schemas.android.com/apk/res/android"
    xmlns:app="http://schemas.android.com/apk/res-auto"
    android:id="@+id/drawerlayout"
    android:layout_width="match_parent"
    android:layout_height="match_parent">


    <com.arms.flowview.motion.DrawerContent
        android:layout_width="match_parent"
        android:layout_height="match_parent"
        app:layoutDescription="@xml/fragemnt_motion_swipe_content_scene">

        <androidx.recyclerview.widget.RecyclerView
            android:id="@+id/rv"
            android:layout_width="match_parent"
            android:layout_height="match_parent"
            app:layoutManager="androidx.recyclerview.widget.LinearLayoutManager" />

    </com.arms.flowview.motion.DrawerContent>


    <RelativeLayout
        android:layout_width="180dp"
        android:layout_height="match_parent"
        android:layout_gravity="start">

        <TextView
            android:layout_width="180dp"
            android:layout_height="match_parent"
            android:background="@color/black"
            android:gravity="center"
            android:text="123123"
            android:textColor="@color/white"
            android:textSize="20sp" />

    </RelativeLayout>

</androidx.drawerlayout.widget.DrawerLayout>
这样我们就实现了一个带有侧滑菜单并且主视图内容有缩放的效果。
效果2
先分析当前的动画效果,向右滑动时,整体右移,视图1移出屏幕,视图2宽度缩小移动到视图1的位置,
视图3放大移动到视图2的位置,屏幕外的视图4移动到屏幕内视图3的位置,向左滑动类似,左右滑动都需要处理反向已经在屏幕外的视图,所以视图的总数是5。
动画的Sence:
<?xml version="1.0" encoding="utf-8"?>
<MotionScene xmlns:android="http://schemas.android.com/apk/res/android"
    xmlns:app="http://schemas.android.com/apk/res-auto">

    <Transition
        android:id="@+id/backward"
        app:constraintSetEnd="@+id/previous"
        app:constraintSetStart="@id/start"
        app:duration="1000">
        <OnSwipe
            app:dragDirection="dragLeft"
            app:touchAnchorSide="left" />
    </Transition>

    <Transition
        android:id="@+id/forward"
        app:constraintSetEnd="@id/next"
        app:constraintSetStart="@id/start">

        <OnSwipe
            app:dragDirection="dragRight"
            app:touchAnchorSide="right" />

    </Transition>


    <ConstraintSet android:id="@+id/previous">

        <Constraint
            android:id="@id/iv0"
            android:layout_width="60dp"
            android:layout_height="200dp"
            app:layout_constraintBottom_toBottomOf="parent"
            app:layout_constraintStart_toStartOf="parent"
            app:layout_constraintTop_toTopOf="parent" />

        <Constraint
            android:id="@id/iv1"
            android:layout_width="0dp"
            android:layout_height="200dp"
            app:layout_constraintBottom_toBottomOf="parent"
            app:layout_constraintEnd_toStartOf="@id/iv2"
            app:layout_constraintStart_toEndOf="@id/iv0"
            app:layout_constraintTop_toTopOf="parent" />

        <Constraint
            android:id="@id/iv2"
            android:layout_width="60dp"
            android:layout_height="200dp"
            app:layout_constraintBottom_toBottomOf="parent"
            app:layout_constraintEnd_toEndOf="parent"
            app:layout_constraintTop_toTopOf="parent" />

        <Constraint
            android:id="@id/iv3"
            android:layout_width="60dp"
            android:layout_height="200dp"
            app:layout_constraintBottom_toBottomOf="parent"
            app:layout_constraintStart_toEndOf="parent"
            app:layout_constraintTop_toTopOf="parent" />

    </ConstraintSet>


    <ConstraintSet android:id="@+id/start">

        <Constraint
            android:id="@id/iv0"
            android:layout_width="60dp"
            android:layout_height="200dp"
            app:layout_constraintBottom_toBottomOf="parent"
            app:layout_constraintEnd_toStartOf="parent"
            app:layout_constraintTop_toTopOf="parent" />

        <Constraint
            android:id="@id/iv1"
            android:layout_width="60dp"
            android:layout_height="200dp"
            app:layout_constraintBottom_toBottomOf="parent"
            app:layout_constraintStart_toStartOf="parent"
            app:layout_constraintTop_toTopOf="parent" />

        <Constraint
            android:id="@id/iv2"
            android:layout_width="0dp"
            android:layout_height="200dp"
            app:layout_constraintBottom_toBottomOf="parent"
            app:layout_constraintEnd_toStartOf="@id/iv3"
            app:layout_constraintStart_toEndOf="@id/iv1"
            app:layout_constraintTop_toTopOf="parent" />

        <Constraint
            android:id="@id/iv3"
            android:layout_width="60dp"
            android:layout_height="200dp"
            app:layout_constraintBottom_toBottomOf="parent"
            app:layout_constraintEnd_toEndOf="parent"
            app:layout_constraintTop_toTopOf="parent" />

        <Constraint
            android:id="@id/iv4"
            android:layout_width="60dp"
            android:layout_height="200dp"
            app:layout_constraintBottom_toBottomOf="parent"
            app:layout_constraintStart_toEndOf="parent"
            app:layout_constraintTop_toTopOf="parent" />

    </ConstraintSet>

    <ConstraintSet android:id="@+id/next">

        <Constraint
            android:id="@id/iv1"
            android:layout_width="60dp"
            android:layout_height="200dp"
            app:layout_constraintBottom_toBottomOf="parent"
            app:layout_constraintEnd_toStartOf="parent"
            app:layout_constraintTop_toTopOf="parent" />

        <Constraint
            android:id="@id/iv2"
            android:layout_width="60dp"
            android:layout_height="200dp"
            app:layout_constraintBottom_toBottomOf="parent"
            app:layout_constraintStart_toStartOf="parent"
            app:layout_constraintTop_toTopOf="parent" />

        <Constraint
            android:id="@id/iv3"
            android:layout_width="0dp"
            android:layout_height="200dp"
            app:layout_constraintBottom_toBottomOf="parent"
            app:layout_constraintEnd_toStartOf="@id/iv4"
            app:layout_constraintStart_toEndOf="@id/iv2"
            app:layout_constraintTop_toTopOf="parent" />

        <Constraint
            android:id="@id/iv4"
            android:layout_width="60dp"
            android:layout_height="200dp"
            app:layout_constraintBottom_toBottomOf="parent"
            app:layout_constraintEnd_toEndOf="parent"
            app:layout_constraintTop_toTopOf="parent" />
    </ConstraintSet>
</MotionScene>
这里面包含了三组的状态,分别对应了起始状态Start,向右滑动的Next状态,向左滑动的后的previous状态,当每次状态变化执行后,那么相应的状态会重置为Start,但是view的位置是已经发生了变化的,这也就是为什么能够用三个状态来实现对应效果的原因,Constraint所使用的id,应该就是为了在状态第一次生效时确定view的。
对应的布局:
<?xml version="1.0" encoding="utf-8"?>
<androidx.constraintlayout.motion.widget.MotionLayout xmlns:android="http://schemas.android.com/apk/res/android"
    xmlns:app="http://schemas.android.com/apk/res-auto"
    android:layout_width="match_parent"
    android:layout_height="match_parent"
    app:layoutDescription="@xml/fragment_motion_image_scene">

    <ImageView
        android:id="@+id/iv_back"
        android:layout_width="match_parent"
        android:layout_height="match_parent"
        android:src="@drawable/dm1"
        android:scaleType="centerCrop"
        />

    <ImageView
        android:id="@+id/iv0"
        android:layout_width="60dp"
        android:layout_height="200dp"
        android:scaleType="centerCrop"
        android:src="@drawable/dm4"
        app:layout_constraintBottom_toBottomOf="parent"
        app:layout_constraintEnd_toStartOf="parent"
        app:layout_constraintTop_toTopOf="parent" />

    <ImageView
        android:id="@+id/iv1"
        android:layout_width="60dp"
        android:layout_height="200dp"
        android:scaleType="centerCrop"
        android:src="@drawable/dm5"
        app:layout_constraintBottom_toBottomOf="parent"
        app:layout_constraintStart_toStartOf="parent"
        app:layout_constraintTop_toTopOf="parent" />


    <ImageView
        android:id="@+id/iv2"
        android:layout_width="0dp"
        android:layout_height="200dp"
        android:scaleType="centerCrop"
        android:src="@drawable/dm1"
        app:layout_constraintBottom_toBottomOf="parent"
        app:layout_constraintEnd_toStartOf="@id/iv3"
        app:layout_constraintStart_toEndOf="@id/iv1"
        app:layout_constraintTop_toTopOf="parent" />

    <ImageView
        android:id="@+id/iv3"
        android:layout_width="60dp"
        android:layout_height="200dp"
        android:scaleType="centerCrop"
        android:src="@drawable/dm2"
        app:layout_constraintBottom_toBottomOf="parent"
        app:layout_constraintEnd_toEndOf="parent"
        app:layout_constraintTop_toTopOf="parent" />

    <ImageView
        android:id="@+id/iv4"
        android:layout_width="60dp"
        android:layout_height="200dp"
        android:scaleType="centerCrop"
        android:src="@drawable/dm3"
        app:layout_constraintBottom_toBottomOf="parent"
        app:layout_constraintStart_toEndOf="parent"
        app:layout_constraintTop_toTopOf="parent" />

    <androidx.constraintlayout.helper.widget.Carousel
        android:id="@+id/carousel"
        android:layout_width="wrap_content"
        android:layout_height="wrap_content"
        app:carousel_backwardTransition="@id/backward"
        app:carousel_firstView="@id/iv2"
        app:carousel_forwardTransition="@id/forward"
        app:carousel_infinite="true"
        app:carousel_nextState="@id/next"
        app:carousel_previousState="@id/previous"
        app:constraint_referenced_ids="iv0,iv1,iv2,iv3,iv4" />

</androidx.constraintlayout.motion.widget.MotionLayout>
Carousel设置了相关的属性:
- carousel_backwardTransition在Secene中向后执行的Transition
- carousel_forwardTransition在Secene中向前执行的Transition
- carousel_firstView:确定第一个view是哪个,会关系到数据的展示顺序
- carousel_infinite:是否无限循环
- carousel_nextState:next状态对应的ConstraintSet
- carousel_previousState:previous状态对应的ConstraintSet
- constraint_referenced_ids:受到控制的id
对应在代码中设置Carousel的Adapter代码
 binding.carousel.setAdapter(object : Carousel.Adapter {
            override fun count(): Int {
                return 5
            }

            override fun populate(view: View?, index: Int) {
                if (view is ImageView) {
                    view.load(imags[index])
                }
            }

            override fun onNewItem(index: Int) {
                binding.ivBack.load(imags[index])
            }

        })
在代码中count确定了总的数量,populate视图变化后的子view以及它的下标,onNewItem在firstView位置当前视图的下标。
Motion适合实现一些复杂的动画效果,不过因为是通过xml预先配置好的,所以并不适合一些动态视图的效果。